
Global Templates
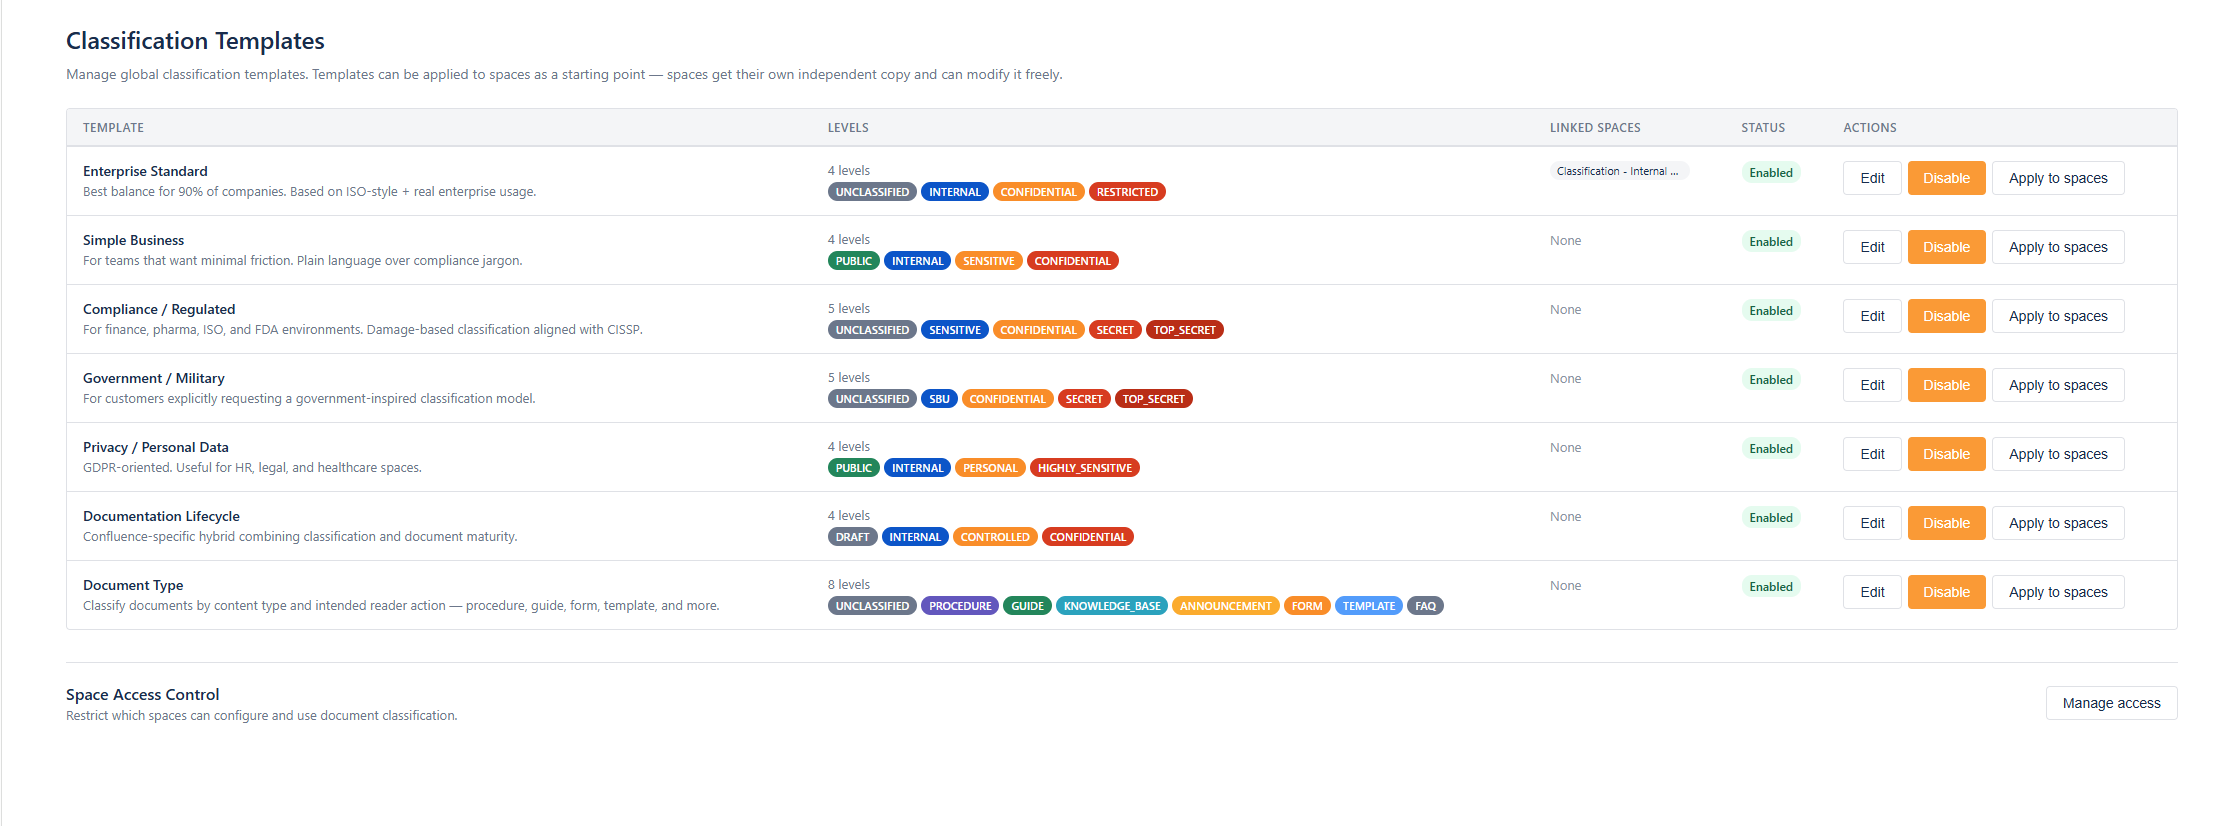
The Classification Templates screen (under Apps → Classification Templates) is where a Confluence administrator defines classification once for the whole site and rolls it out to many spaces consistently. This is the recommended way to keep every space using the same classification levels, colours, labels, and restrictions.
What a global template is
Section titled “What a global template is”A global template is a named, reusable set of classification levels — the same levels described in Space Settings (name, colour, description, view and edit groups, label, page header style, image and banner text size) — and, optionally, a header image size for the whole space.
When a template is applied to a space, the levels are copied into that space and the space becomes linked to the template. A space is linked to exactly one template at a time: applying a different template moves the link across.
Linked spaces are template-managed. When you re-apply a template — for example after editing one of its levels — the linked spaces you select receive the updated levels. To make a space independent again, the space admin uses Unlink in Space Settings.
The template library
Section titled “The template library”The screen lists all global templates. Classify ships with 6 predefined templates (for example Enterprise Standard and Simple Business) that are seeded automatically the first time you open the screen. You can use these as they are, edit them, or add your own.
At the bottom of the list you will also find Documentation and Support links, which open this guide and the Zeitdocs support portal.
Creating or editing a template
Section titled “Creating or editing a template”- Add a new template or open an existing one.
- Give it a name and description.
- Add classification levels — the same fields as space levels.
- Save.
Enabling or disabling a template
Section titled “Enabling or disabling a template”Each template has an enabled toggle. Only enabled templates appear to space admins in the byline onboarding and the “Add from template” picker. Disable a template to retire it without deleting it.
Applying a template to spaces
Section titled “Applying a template to spaces”From a template, open Apply to Spaces to roll it out. The screen guides you through four steps: select → confirm → progress → result.
Rollouts run in the background, so a template can be applied to hundreds of spaces in a single action.
1. Select the spaces
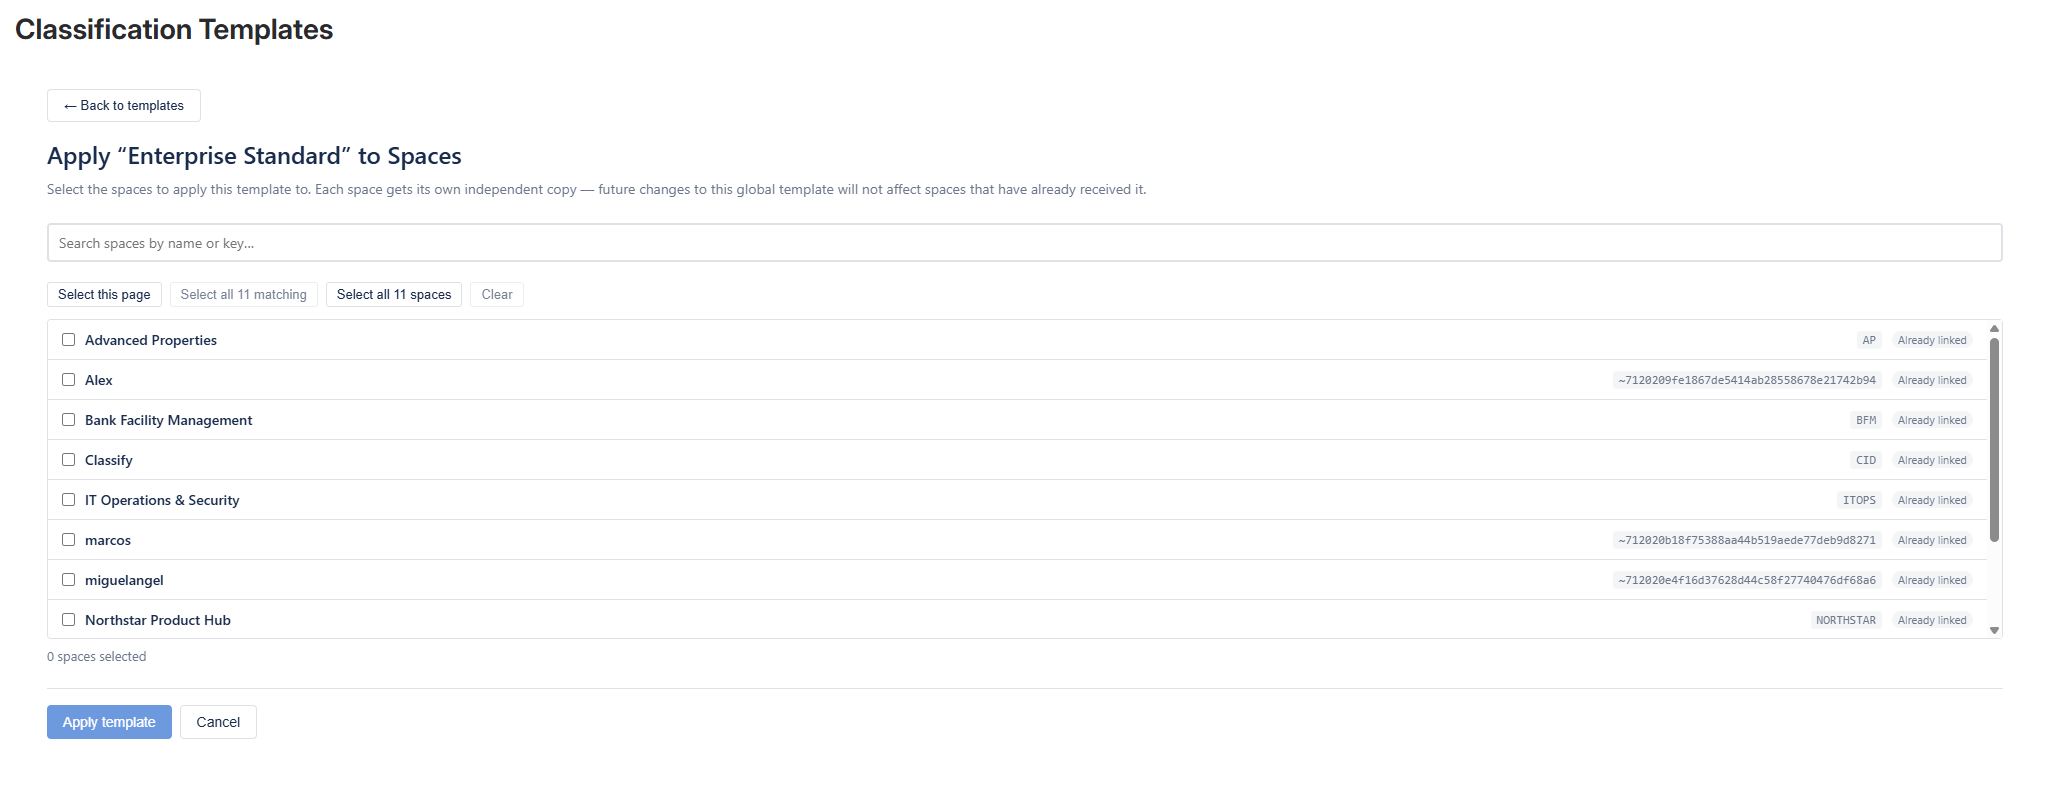
Section titled “1. Select the spaces”The space list is searchable and paginated at 25 spaces per page. A selection can span several pages, so the selected count is shown above the list and always reflects your whole selection, not just the current page.
Four buttons help with large selections:
| Button | Selects |
|---|---|
| Select page | Every space on the current page. |
| Select all matching | Every space matching your current search. |
| Select all spaces | Every space in the site. |
| Clear | Nothing — empties the selection. |
Spaces that already use this template carry an “Already linked” badge. This is information only: the row stays selectable, and selecting it means the space will be updated with the template’s current levels.
2. Confirm what will happen
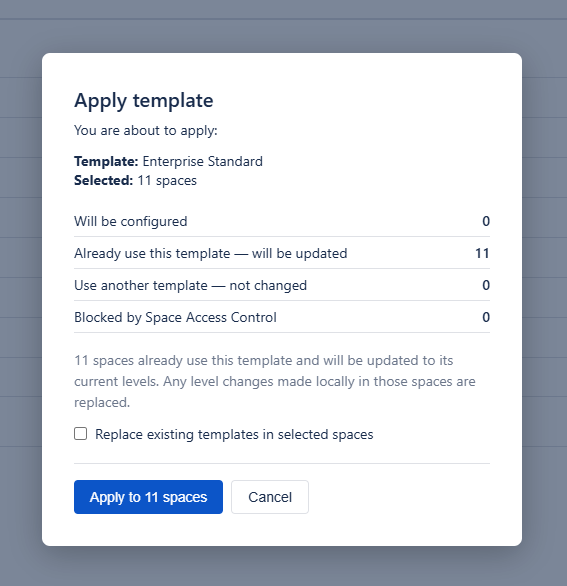
Section titled “2. Confirm what will happen”Before anything is written, Classify shows a summary of your selection, grouped by what will happen to each space:
| Group | Meaning |
|---|---|
| Will be configured | The space has no classification configuration yet, or one with no levels. The template will be applied. |
| Already use this template — will be updated | The space is linked to this template and will receive its current levels. |
| Use another template — not changed | The space is configured from a different template and is left untouched, unless you choose to replace it. |
| Blocked by Space Access Control | The space is blocked by policy and is never written. |
If the template sets a header image size, the summary names it, so you can see that the rollout will also change the banner height in the spaces it reaches.
A Replace existing templates in selected spaces checkbox sits below the summary. It is unchecked by default. Ticking it moves the Use another template spaces into the group that will be written, and the summary updates immediately, so you can see the effect before you commit.
3. Progress
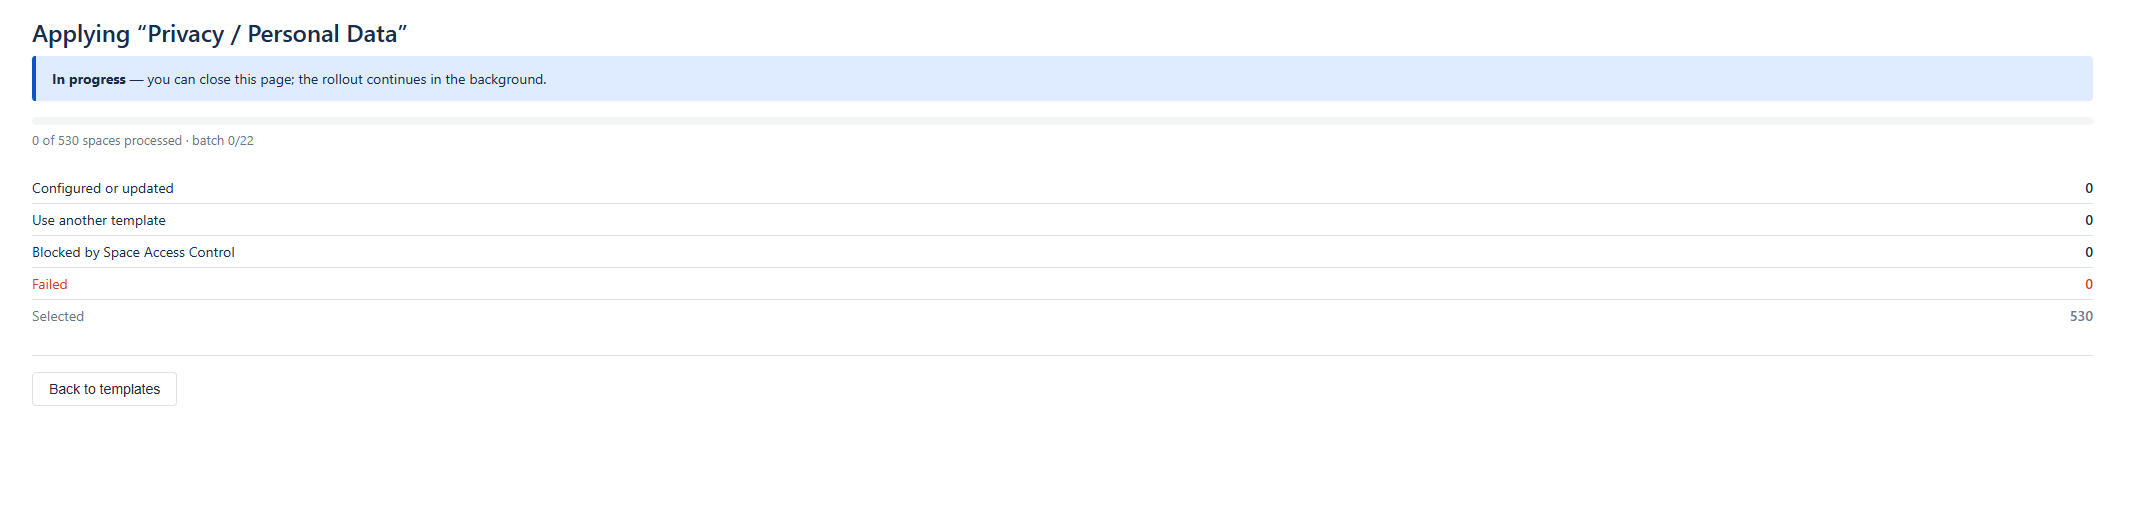
Section titled “3. Progress”Once the rollout starts, a progress bar shows how many of the selected spaces have been processed.
The work runs in the background on Atlassian’s servers, not in your browser. You can close the panel, navigate away, or close the browser entirely, and the rollout continues. If you reopen Apply to Spaces for the same template while a rollout is still running, the progress screen reappears automatically.
4. Result
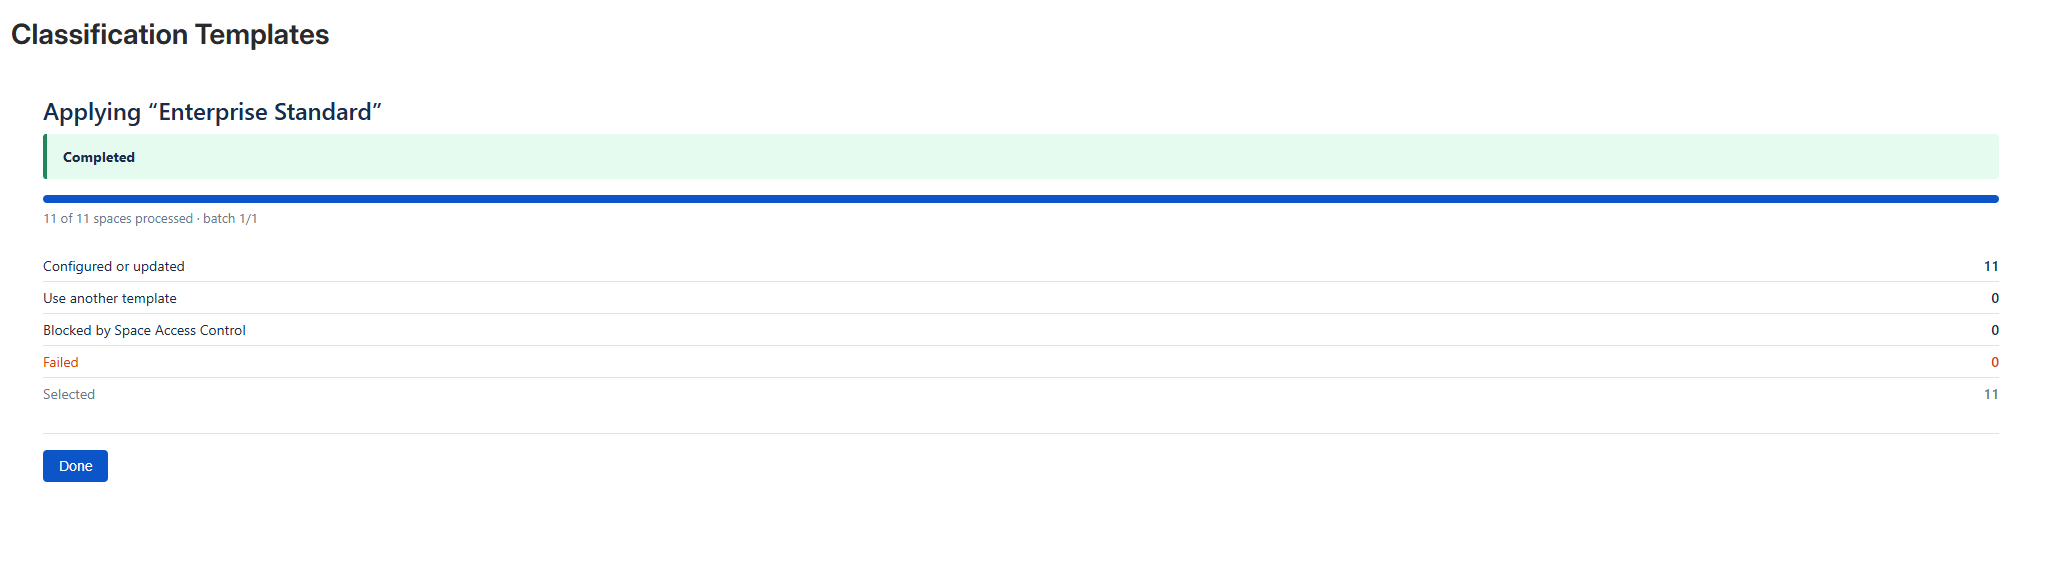
Section titled “4. Result”When the rollout finishes, you get the outcome for every space in the selection:
- Configured or updated — the spaces that received the template.
- Use another template — the spaces left untouched.
- Blocked by Space Access Control — the spaces skipped by policy.
- Spaces that failed — listed individually with the space key, its name, and the reason.
Retrying failed spaces
Section titled “Retrying failed spaces”If any spaces failed, a retry action re-runs the rollout for those spaces only. A retry:
- keeps the Replace existing templates choice made for the original rollout, so it can never widen what gets overwritten;
- re-checks each space against its current state, so a space that has since been reconfigured, blocked or deleted is handled correctly;
- is itself retryable, up to a small fixed number of attempts.
Some failures are reported as permanent — for example, the template was deleted while the rollout was running. In that case Classify tells you that retrying will not help, so you can fix the cause first.
Header image size on a template
Section titled “Header image size on a template”A global template can optionally carry a header image size — Small, Medium, Large or Auto — alongside its classification levels. This is the way to change the banner height across a whole Confluence site without opening every space.
| Setting | What happens on a rollout |
|---|---|
| A size is set | Every space the template reaches gets that size, replacing whatever the space admin had chosen locally. |
| No size is set | Each space keeps its own size. This is the default, and templates created before this option existed behave this way. |
Leave it unset when spaces should decide their own banner height, and set it when you want one consistent height everywhere.
A template’s header image size only reaches a space when the template is applied. Changing it on the template alone changes nothing until you re-apply the template to the spaces that use it.
See Page Banner for what each size looks like to page readers.
[Screenshot needed: the header image size selector in the global template editor]
Seeing which spaces use a template
Section titled “Seeing which spaces use a template”Each template shows its linked spaces as pills (up to 5). If more than five spaces are linked, a “+N more” link opens a dialog listing them all.
Because a space is linked to exactly one template, applying a new template to a space also removes it from the linked-spaces list of the template it used before.
Manage access
Section titled “Manage access”A Manage access button at the bottom of the templates list opens Space Access Control, where you decide which spaces are allowed to use classification at all. See Space Access Control.
- Edit the predefined templates rather than starting from scratch — they cover common classification schemes.
- Disable instead of delete when retiring a scheme, so existing spaces keep working.
- To push a template change out, edit the template and then re-apply it to the spaces that use it — select them in Apply to Spaces and confirm.
- Read the confirmation summary before starting a large rollout. It is the point at which you can still see how many spaces will be overwritten.
- Roll out to a small group of spaces first when trying out a new template, then repeat for the rest.
- Set a header image size on the template when you want one consistent banner height across the site; leave it unset to let each space decide.
Related
Section titled “Related”- Space Settings — how space admins apply templates locally.
- Space Access Control — controlling which spaces can classify.